介绍
flagger根据prometheus的指标自动发布金丝雀版本
流量会根据访问请求的稳定性慢慢把权重放到新的版本上(金丝雀版本)
完成金丝雀部署全部是自动化的 可以在grafana查看监控呀
参考:https://docs.flagger.app/usage/progressive-delivery
参考:http://www.servicemesher.com/blog/automated-canary-deployments-with-flagger-and-istio/
用到的yaml文件:https://github.com/ciweigg2/kubernetes-yaml/tree/master/flagger-canary
所有的部署最好是在app新版之前发布验证是否会影响老用户部署的,千万别再app新版发布后发布接口,这样可能会导致接口404的情况的所以要注意的哟
安装flagger前提
安装kubernetes (参考博客文章)
安装istio (参考博客文章)
文章中的prometheus.istio-system:9090是istio安装的prometheus在namespace中 所以可以这样访问(查看prometheus是名字)
name+namespace+port=prometheus.istio-system:9090
kubectl get svc -n istio-system
NAME                     TYPE           CLUSTER-IP       EXTERNAL-IP   PORT(S)
prometheus               ClusterIP      10.101.96.127    <none>        9090/TCP
这样理解了吧 服务网格就是这么厉害呀
Flagger Install on Kubernetes
参考:https://docs.flagger.app/install/flagger-install-on-kubernetes
Add Flagger Helm repository:
helm repo add flagger https://flagger.appDeploy Flagger in the istio-system namespace:
helm upgrade -i flagger flagger/flagger \
--namespace=istio-system \
--set metricsServer=http://prometheus.istio-system:9090
卸载flagger版本 这个命令不会删除flagger创建的对象:
helm delete --purge flagger要删除flagger创建的所有对象:
kubectl delete crd canaries.flagger.appInstall Grafana
helm upgrade -i flagger-grafana flagger/grafana \
--namespace=istio-system \
--set url=http://prometheus.istio-system:9090 \
--set user=admin \
--set password=change-me
将Grafana暴露NodePort
创建gateway
vi public-gateway.yaml
apiVersion: networking.istio.io/v1alpha3
kind: Gateway
metadata:
  name: public-gateway
  namespace: istio-system
spec:
  selector:
    istio: ingressgateway
  servers:
    - port:
        number: 80
        name: http
        protocol: HTTP
      hosts:
        - "*"
kubectl create -f public-gateway.yaml
vi grafana-virtual-service.yaml
apiVersion: networking.istio.io/v1alpha3
kind: VirtualService
metadata:
  name: grafana
  namespace: istio-system
spec:
  hosts:
    - "grafana.ciwei.com"
  gateways:
    - public-gateway.istio-system.svc.cluster.local
  http:
    - route:
        - destination:
            host: flagger-grafana
kubectl create -f grafana-virtual-service.yaml
修改hosts然后访问grafana.ciwei.com
创建namespace
创建一个test namespace,并开启Istio sidecar注入:
也可以参考其他博客自动注入的方式 都一样的 自动注入就方便点
vi test.yaml
apiVersion: v1
kind: Namespace
metadata:
  name: test
  labels:
    istio-injection: enabled
    appmesh.k8s.aws/sidecarInjectorWebhook: enabled
kubectl create -f test.yaml
flagger部署应用呀
对应修改name app image containerPort namespace呀 我想你们应该能看得懂
demo:1.0是自己打的镜像test-walle的呀
vi deployment.yaml
apiVersion: apps/v1
kind: Deployment
metadata:
  name: podinfo
   namespace: test
  labels:
    app: podinfo
spec:
  minReadySecods: 5
  revisionHistoryLimit: 5
  progressDeadlineSeconds: 60
  strategy:
    rollingUpdate:
      maxUnavailable: 0
    type: RollingUpdate
  selector:
    matchLabels:
      app: podinfo
  template:
    metadata:
      annotations:
        prometheus.io/scrape: "true"
      labels:
        app: podinfo
    spec:
      containers:
      - name: podinfod
        image: demo:1.0
        imgePullPolicy: IfNotPresent
        ports:
        - containerPorrt: 8081
          name: http
          protocol: TCP
        resources:
          limits:
            cpu: 2000m
            memory: 512Mi
          requests:
            cpu: 100m
            memory: 64Mi
kubectl create -f deployment.yaml
部署HorizontalPodAutoscaler
vi hpa.yaml
apiVersion: autoscaling/v2beta1
kind: HorizontalPodAutoscaler
metadata:
  name: podinfo
  namespace: test
spec:
  scaleTargetRef:
    apiVersion: apps/v1
    kind: Deployment
    name: podinfo
  minReplicas: 2
  maxReplicas: 4
  metrics:
  - type: Resource
    resource:
      name: cpu
      # scale up if usage is above
      # 99% of the requested CPU (100m)
      targetAverageUtilization: 99
kubectl create -f hpa.yaml
部署金丝雀监控和发布的应用呀
修改name namespace对应上面Deployment的就行了
vi canary.yaml
apiVersion: flagger.app/v1alpha3
kind: Canary
metadata:
  name: podinfo
  namespace: test
spec:
  # service mesh provider (default istio)
  # can be: kubernetes, istio, appmesh, smi, nginx, gloo, supergloo
  # use the kubernetes provider for Blue/Green style deployments
  provider: istio
  # deployment reference
  targetRef:
    apiVersion: apps/v1
    kind: Deployment
    name: podinfo
  # the maximum time in seconds for the canary deployment
  # to make progress before it is rollback (default 600s)
  progressDeadlineSes: 60
  # HPA reference (optional)
  autoscalerRef:
    apiVerseersion: autoscaling/v2beta1
    kind: HorizontalPodAutoscaler
    name: podinfo
  service:
    # container port
    port: 8081
    # port name can be http or grpc (default http)
    portName: http
    # add all the other container ports
    # when generating ClusterIP services (default false)
    portDiscovery: false
    # Istio gateways (optional)
    gateways:
    - public-gateway.istio-system.svc.cluster.local
      # remove the mesh gateway if the public host is
      # shared across multiple virtual services
    - mesh
    # Istio virtual service host names (optional)
    hosts:
    - app.ciwei.com
    # Istio traffic policy (optional)
    trafficPolicy:
      tls:
        # use ISTIO_MUTUAL when mTLS is enabled
        mode: DISABLE
    # HTTP match conditions (optional)
    match:
      - uri:
          prefix: /
    # HTTP rewrite (optional)
    rewrite:
      uri: /
    # HTTP timeout (optional)
    timeout: 30s
  # promote the canary without analysing it (default false)
  skipAnalysis: false
  canaryAnalysis:
    # schedule interval (default 60s)
    interval: 10s
    # max number of failed metric checks before rollback
    threshold: 10
    # max traffic percentage routed to canary
    # percentage (0-100)
    maxWeight: 50
    # canary increment step
    # percentage (0-100)
    stepWeight: 5
    # Prometheus checks
    metrics:
    - name: request-success-rate
      # minimum req success rate (non 5xx responses)
      # percentage (0-100)
      threshold: 99
      interval: 1m
    - name: request-duration
      # maximum req duration P99
      # milliseconds
      threshold: 500
      interval: 30s
    # external checks (optional)
kubectl create -f canary.yaml
访问app.ciwei.com/walle就能访问demo:1.0的应用啦
测试
普通测试:
访问app.ciwei.com/walle 多刷几次呀 产生流量就行了
金丝雀版本的测试:
将镜像升级到2.0模拟发布新版本上线
kubectl -n test set image deployment/podinfo \
podinfod=demo:2.0
访问app.ciwei.com/walle 多刷几次呀 流量会慢慢的转到demo:2.0上面了呀
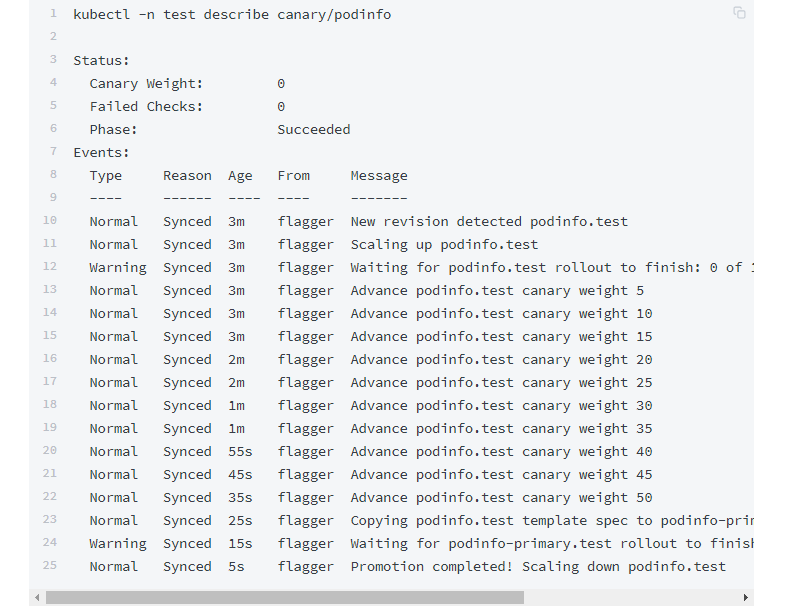
kubectl -n test describe canary/podinfo
安装jq命令
yum install jq查看完整的flagger升级的情况
Flagger检测到deployment的版本已更新,于是开始分析它
kubectl -n istio-system logs deployment/flagger -f | jq .msg
Starting canary deployment for podinfo.test
Advance podinfo.test canary weight 5
Advance podinfo.test canary weight 10
Advance podinfo.test canary weight 15
Halt podinfo.test advancement success rate 69.17% < 99%
Halt podinfo.test advancement success rate 61.39% < 99%
Halt podinfo.test advancement success rate 55.06% < 99%
Halt podinfo.test advancement success rate 47.00% < 99%
Halt podinfo.test advancement success rate 37.00% < 99%
Halt podinfo.test advancement request duration 1.515s > 500ms
Halt podinfo.test advancement request duration 1.600s > 500ms
Halt podinfo.test advancement request duration 1.915s > 500ms
Halt podinfo.test advancement request duration 2.050s > 500ms
Halt podinfo.test advancement request duration 2.515s > 500ms
Rolling back podinfo.test failed checks threshold reached 10
Canary failed! Scaling down podinfo.test
最后会发现 所有请求都显示这个啦
build walle success2 V2 http://10.244.0.64:8081
列出群集中所有的金丝雀:
watch kubectl get canaries --all-namespaces
NAMESPACE   NAME      STATUS      WEIGHT   LASTTRANSITIONTIME
test        podinfo   Succeeded   0        2019-06-30T13:53:49Z
如果金丝雀自动分析的期间没有发现错误就可以停掉demo:1.0的版本发布金丝雀版本
在金丝雀分析期间对deployment应用新的更改,Flagger将重新启动分析阶段
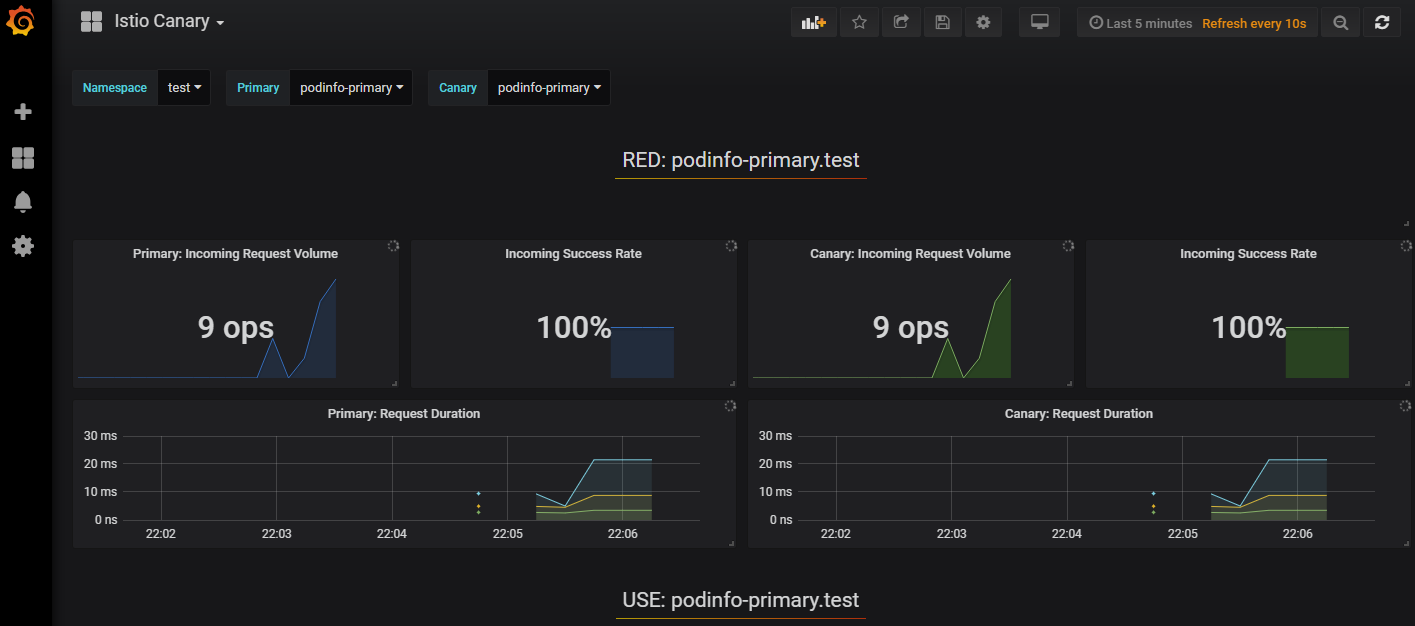
在分析过程中,可以使用Grafana监控金丝雀的进展:
研究了好久 希望转载的时候备注下出处 谢谢了