介绍
“约定优于配置”是Spring Boot倡导的一个思想,而其自动配置的特性则恰好体现了这一思想。有了自动配置,不仅简化了Maven的依赖配置,更重要的是摆脱了以往使用Spring框架开发时,所必须编写的一堆繁琐的xml配置文件。而要使用自动配置,我们也只需要简单的在依赖中引入Starter依赖即可,例如,要在Spring Boot中启用Spring MVC,我们只需要在pom文件中引入spring-boot-starter-web依赖即可,其他配置将Spring Boot自动完成。
下面,我们试着简单封装自己的一个Starter实现。
在Starter命名规则上面,spring-boot-starter-xxx是官方提供的命名规则,非官方Starter的命名规则则建议为 xxx-spring-boot-starter
新建Spring Boot项目
添加Maven依赖
<dependency>
    <groupId>org.springframework.boot</groupId>
    <artifactId>spring-boot-autoconfigure</artifactId>
</dependency>

<dependency>
    <groupId>org.springframework.boot</groupId>
    <artifactId>spring-boot-configuration-processor</artifactId>
    <optional>true</optional><!--true表明该依赖不会间接传递-->
</dependency>
定义服务类及属性配置类
读取properties中test.service开头的配置
@ConfigurationProperties(prefix = "test.service")
@Data
public class TestServiceProperties {

    private String prop1;

    private String prop2;

}
设置Service方法并且赋予默认值
@Data
public class TestService {

    private String prop1;

    private String prop2;

    public TestService(TestServiceProperties testServiceProperties) {
        this.prop1 = testServiceProperties.getProp1();
        this.prop2 = testServiceProperties.getProp2();
    }
}
定义自动配置类
编写代码呀
@Configuration
@ConditionalOnClass(TestService.class)
@EnableConfigurationProperties(TestServiceProperties.class)
public class TestServiceConfiguration {

    @Autowired
    private TestServiceProperties testServiceProperties;

    @Bean
    @ConditionalOnMissingBean
    //前缀为test.service的enabled的值为true才生效
    @ConditionalOnProperty(prefix = "test.service", value = "enabled", havingValue = "true")
    public TestService testService(){
        return new TestService(testServiceProperties);
    }
}
也可以将enabled属性放在TestServiceProperties类中使用如下写法
TestServiceProperties中添加private String enabled;

@ConditionalOnProperty(prefix = "test.service", value = "enabled", havingValue = "true")替换为@ConditionalOnProperty(name = "test.service.enabled", havingValue = "true")
注解解释
@ConditionalOnClass用于指定classpath下存在某些类才生效

@ConditionalOnMissingBean表示IOC容器中缺失某些bean时生效

@ConditionalOnProperty则表示参数配置满足特定的值才生效,这些注解被称作条件化注解,常结合@Configuration注解使用。
相似的注解
其他类似注解还有@ConditionalOnWebApplication,@ConditionalOnNotWebApplication,@ConditionalOnMissingClass,@ConditionalOnBean等。
创建spring.factories文件
在/resources文件夹下,新建META-INF文件夹,并在该文件夹下新建spring.factories文件:
单个自动装配
org.springframework.boot.autoconfigure.EnableAutoConfiguration=\
com.example.demo2.TestServiceConfiguration
多个自动装配
org.springframework.boot.autoconfigure.EnableAutoConfiguration=\
com.example.demo2.TestServiceConfiguration,\
com.xxx.xxx
定义提示内容需要在META-INF中创建一个spring-configuration-metadata.json
添加依赖
<dependency>
    <groupId>org.springframework.boot</groupId>
    <artifactId>spring-boot-configuration-processor</artifactId>
    <optional>true</optional><!--true表明该依赖不会间接传递-->
</dependency>
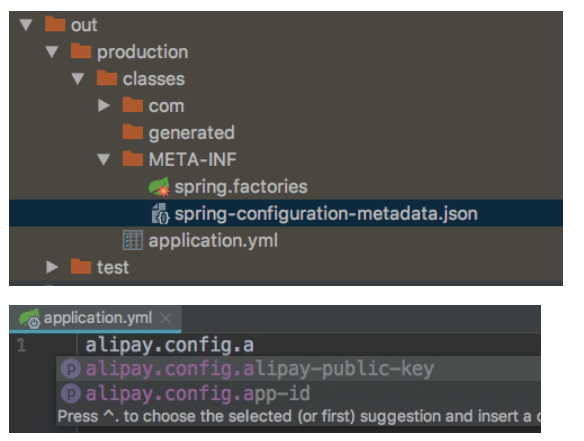
想要自动提示我们需要配置META-INF/spring-configuration-metadata.json文件来描述。但是代码量挺大的,为了方便我们可以通过IDE来生成,这里使用的是idea。
在idea设置中搜索Annotation Processors,接下来勾住Enable annonation processing就完成了。
我们可以在编译后的文件中看到自动生成的spring-configuration-metadata.json

测试
新建Spring Boot项目,引入上面的Starter依赖,application.properties添加相应配置:
#指定该属性为true,配置类才会生效
test.service.enabled=true
test.service.prop1=val1
test.service.prop2=val2
这样TestService的配置就会在Spring Boot启动时自动完成了,而在使用的时候则可以简单通过@Autowire注入使用了:
@Autowired
TestService testService;
提交中央仓库
查看Java 上传本地jar包到maven中央仓库这篇文章呀
代码中包名和groupId都要好好写的 没有域名的情况下 一般这样com.github.xx xx为github的用户名很简单的吧


